Not all iPhone and iPad users know about the iOS Parental Control feature to make the device child-friendly. Parental control service has always been helpful to households with children. Apple’s parental control effect has been effective. And now in iOS 14, it will be more comprehensive and easier to control than before.
If you seek to get the iOS Parental Control feature working, then this is for you. Read this article to get information about Apple’s service.
iOS Parental Control
There is a different level of restrictions that can be set for different household members. A user can block some apps but not others, and also set a wide range of time and age-based restrictions.
If you want to get a new iOS device for your child or share yours with them, here is how to effectively use the iOS Parental Control.
How To Set iOS Parental Control
Now finally at the steps. It is easy to carry out. Follow the guidelines below to access the Parental Control service on the iOS device for your child:
Go to iOS Device Setting
The iOS Parental Control which is called Restriction can be found on Settings. Head to Settings, then tap on Screen Time.
Screen Time displays the iOS device usage info and any restrictions that apply to the users’ ID or device.
Adjust Downtime
Downtime is the first option you will get. This can be used to restrict activities to be done in particular times.
Downtime features is effective at enforcing a social media break. Ensuring that your kids are not online when they are supposed to complete their homework.
You can adjust this feature to the same time daily, or different times on different days. Your device undergoing this operation will be restricted to apps you allow and to phone calls.
Limit Specific Apps
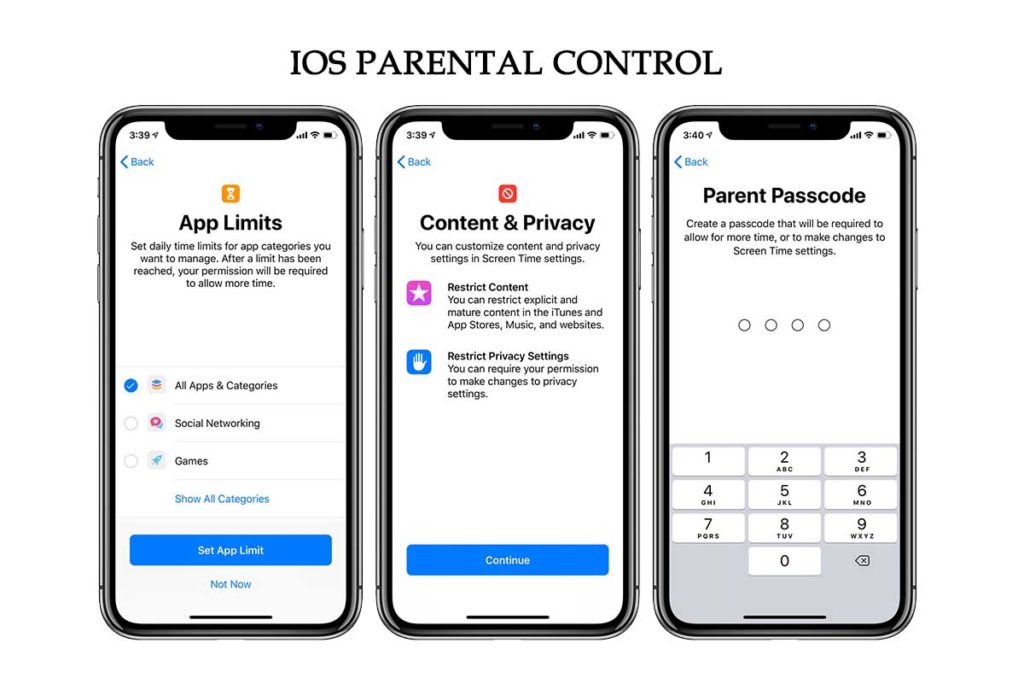
Next is the App Limits option. This option gives fine0-grained access over each app on your device from online shopping to social media and entertainment.
You can enter into All Apps & Categories to select the apps you want to limit. Or tap on Next to continue with the already marked apps.
Set Time Limits
Then it is time to set the Time Limits. This is a way of limiting an app to a particular time usage during a day. If set properly, your kid will be notified five minutes before time that the app is about to shut down.
Decide Apps To Allow
This is the Communication Limits and Always Allowed option. It enables user to control who the device handler can speak to. And also, which app you won’t want to be impacted by parental control.
Messages should be enabled at all times, as well as other apps you won’t want to disable during the Downtime.
Content & Privacy Restrictions
On this option, a user can filter age-inappropriate content. This option looks intimidating because it provides a huge amount of owner control.
You can disable the location services, allow music with the odd words, block horror movies, and limit access to device features such as a microphone or camera.
Set Controls For Other Device
If you are on a Family Share, at the bottom of the page is where you will see links to other members. You can tap on the name of the user to change their settings.
Monitor App Activity
If the Include Website Data is turned on. The parent will get information about the website their child visited. And if not turned on, Safari will only be reported to you as a block of time.
Verdict
As read, iOS Parental Control is a powerful tool and gives access to control over your child. Trust this service to keep an eye watch over your kid’s mobile usage activities.
More Related Content
- Cartoon Network App: Download Cartoon Network App on Android and iOS
- Apple iOS Update: Features, Release Date And Download Steps
- iPhone QR Code Scanner – How To Scan a QR Code on iOS
- Google Opinion Rewards IOS – How to set up your Google Opinion Rewards Account
- Google Stadia – Google Stadia iOS – Google Stadia Gaming


